Home / Site Map / Blog / Books / Events / Bio / Freebies / Media
                  Instagram

 It's natural and unavoidable that the people we write about have some of our character traits, likes, and dislikes, even quirks. Rachel often carried some of my "wish the world was this way" to the page. Peri is no different, but she's a lot less like me than Rachel ever was. Peri is more like the dark sibling, and the "wish the world was this way" parts are correspondingly less moral and more sensation oriented. You'll see my appreciation for beautiful, powerful cars in The Drafter, my wish for technology to live up to what technology is supposed to be, a society more oriented to making our footprint smaller and lighter. Peri's world is focused more on sensational gratification than introspective musings, but she does that too.

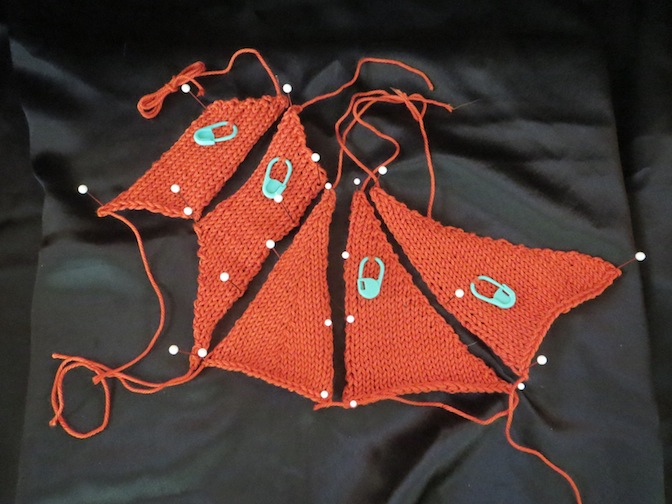
One thing Peri and do share is, ah, knitting. I'll be honest about it. I'm a lot better at it than her. (grin) She has trouble finishing a project, which I didn't realize until book two, but now that I do, she's going to have to realize it as well. Peri and I knit for different reasons--though we both appreciate the zen-like relaxation that comes from quietly using multiple parts of your brain for a complex task made up of simple things. She knits for the meditation--because it's an Opti approved stress relief. I knit more to exercise the problem solving aspect that comes from trying to modify patterns to suit you. Case in point, my Kim Harrison Dragons, my very own pattern from scratch, of which, after over a year of creation, I'm ready to share.

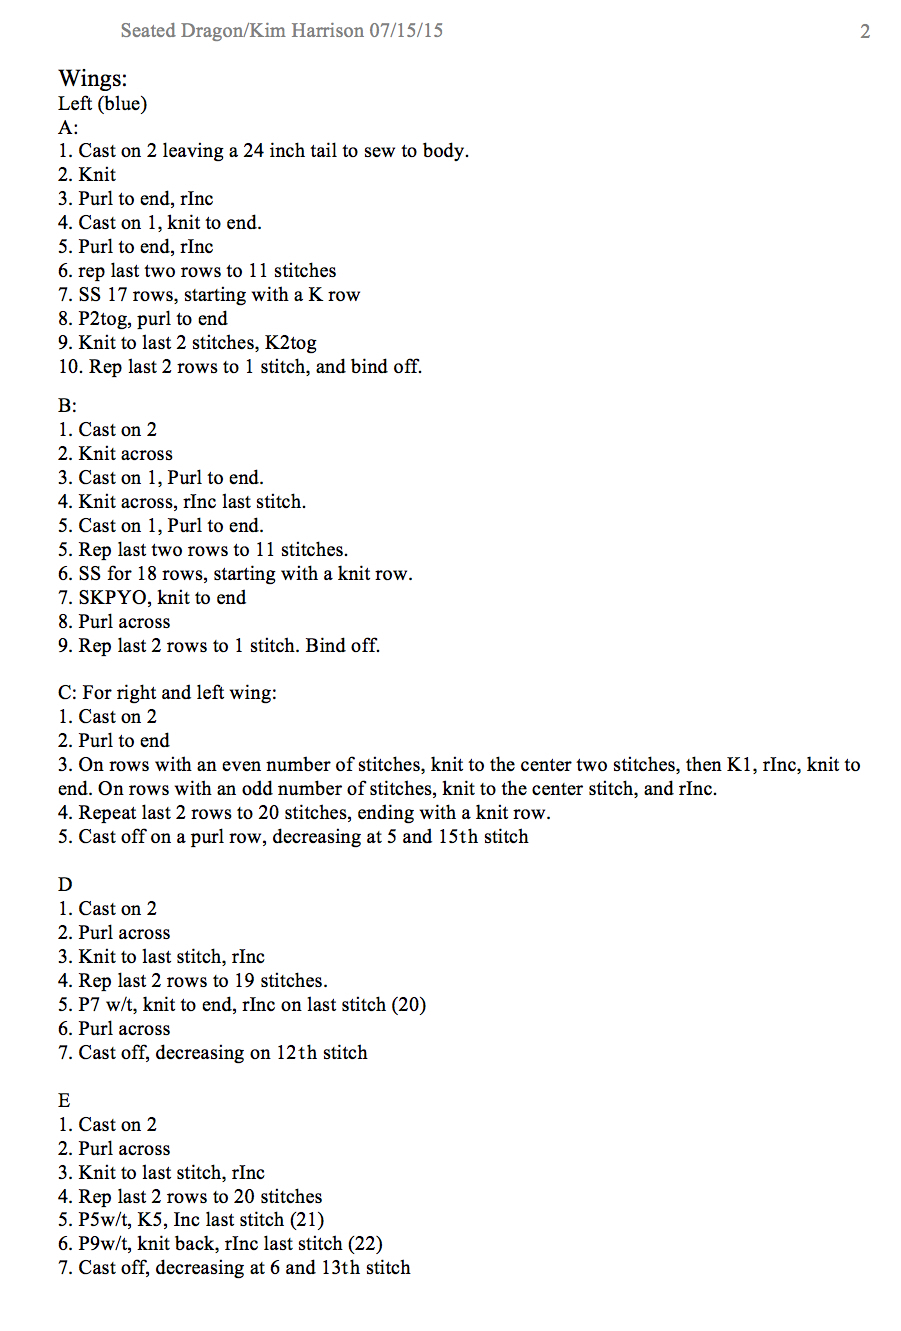
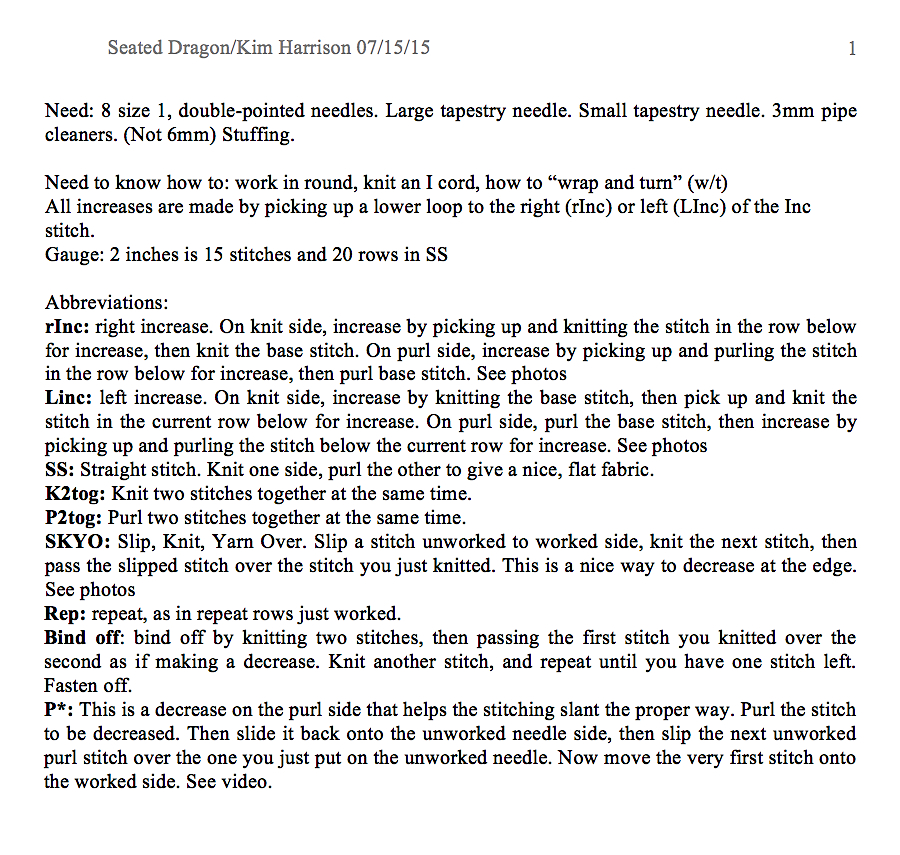
Warning: the pattern below is my own, and because this is not my day-job, the pattern won't have the polish of professionally polished ones. You can show me and other knitters your progress at instagram, FB, and twitter at #KHDragon

Supply list / Left wing panels / Right wing panels / Wing bones / Front legs / Back legs / Tail and Hips / Attach legs / Head / Tummy and backridge / Finishing

K

I

M


H

A

R

R

I

S

O

N

S


D

R

A

G

O

N

I'm going to give you what looks like a lot at first, but I wanted to err on the side of too much info rather than too little. If you get through all the panels, you'll have something that looks like this:

Next, I'll show you how to knit the "bones," and start putting it together.  Then I'll give you the instructions for the right wing panels, and after that, how to attach the wing "backbone."  After that are the feet, but that will need another page.

I usually sew the wings together as I knit the panels so I don't get confused on what panel goes where, but I thought this would be easier than giving it to you all at once. Below are the down and dirty instructions, and below that, the explanation, and way at the bottom, the abbreviations.

The wings are five panels sewn together using pipe cleaners for support. I have found it easier to keep track of the panels if I sew them together as I make them, but for ease of instruction, I'm going to wait to touch on  I cords and pipe cleaners until next time. Downside? You need to mark your panels so you know what they are, especially if you make both the right and left before you begin to sew them together. I use blue for the left, red for the right. If you are a novice, I'll break the first panel down so you can see the rInc on a purl side, and a cast on on the knit side. Experienced knitters might be tempted to do a rInc on the knit side to avoid the cast on, but that will make your panel bunch up.

Cast on one on the knit side, Iinc on a purl:

And because I know rInc and Linc might be tricky, I've got a supplemental:

Mark your row:

Decrease on knit and purls with K2tog, and P2tog:

Bind off.

Panel B is almost identical to panel A with the exception of the decreases, which are only on the knit side, giving us a sharper, longer panel. For the novices, I've got an explanation on SKYO or Slip, knit, yarn over. (sometimes written SKPYO) SKYO

Panel C doesn't have any new techniques, but knowing where to do the increase is tricky. If you have any questions, here's a video:

Panel C increases, rInc

Panel C also has an odd decrease in the cast off to help keep the wing taunt at the base. If my instructions have you scratching your head, I've got exactly what I'm doing in the explanation of how cast off on the purl side with a decrease.

Casting off on a purl side with a decrease:

Panels D and E are almost identical to each other apart from the last few rows. The also introduce a w/t or wrap and turn, which lets you turn your work in the middle of a row without leaving a hole. I use this technique a lot, so I've got a video to ease the confusion on how to do a w/t. This is a w/t on a purl side. I'll have another for a w/t on a knit side later.


Next page: Knitting and attaching wing bones


Revised: 03/06/2017     Copyright © 2015 by Kim Harrison. All rights reserved.